If you are using your custom domain for your blog or website but don’t have an email hosting, then you don’t need to get worry for this. You can use Gmail’s mailing service for free to manage your emails on your blog or website’s professional email addresses.
A custom email on your domain like you@yourdomain.com gives your mails a professional look and every webmaster including bloggers love professionalism. Sometimes, bloggers and website owners can’t afford to purchase email hosting separately when their website hosting package doesn’t provide them email hosting. Similarly, Blogger users, who use their custom domain on Blogger, also need an email hosting. They can purchase one but here in this tutorial, we will learn how to use Gmail’s free service to send and receive emails on your professional addresses without investing even a penny.
Step 1: Setup Mail Forwarding
Almost all domain registrars provide free email forwarding and it is very easy to configure. To use Gmail for sending and receiving emails on your professional addresses, first create and forward email address (es) to your Gmail ID.
For example if your Gmail ID is you@gmail.com and your domain name is yourdomain.com, then go to control panel of your domain and then navigate to email forwarding section. After that, create a desired email address on your domain like you@yourdomain.com and forward it to your Gmail ID.
What if Your Domain Control Panel Doesn’t Support Email Forwarding
(Read and follow only if your domain registrar hasn't provided the feature of email forwarding in your domain panel. If you are able to forward emails from your domain panel, then skip to Step 2 of this tutorial.)
If your domain registrar has provided you with limited features and you aren’t able to forward emails under your domain, then there is yet another solution. Namecheap.com provides free DNS service along with email forwarding.
To go with the free DNS management and email forwarding of NameCheap, signup for a free account at https://www.namecheap.com/myaccount/signup.aspx and add your domain. After that, change the Nameservers from your previous domain panel to below provided Nameservers. This will point your domain to NameCheap servers and once the domain is redirected, configure DNS there to point your domain to your blog / website again and then create and forward email IDs to your Gmail account.
Nameservers for NameCheap
freedns1.registrar-servers.com
freedns2.registrar-servers.com
freedns3.registrar-servers.com
freedns4.registrar-servers.com
Step 2: Add Newly Created Email Addresses to Your Gmail Account
After forwarding the email address to your Gmail ID, now add the email to your Gmail account. To do it, follow below steps:
1. Sign in to your Gmail account
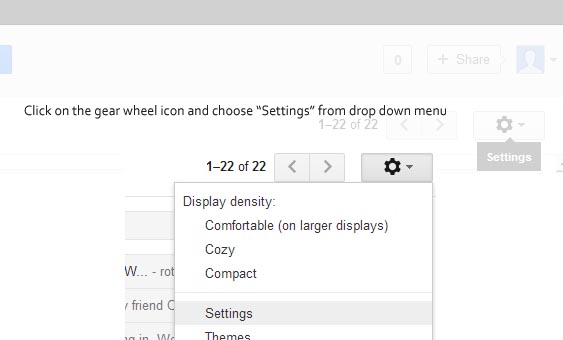
2. Click on 'Settings' icon from near right top of screen and choose "Settings" from drop down list
3. In "Settings" screen, select "Accounts" tab and then click on "Add another email address you own"

4. Once you will click "Add another email address you own" link, a popup window will appear. In the appeared window, fill in necessary details as below:
-In the "Name" field, type in the name which you want to assign to the email ID. Whenever you will send email, this name will appear as "From" name.
-In "Email address" field, type in the email address which you have created under your domain and have forwarded to Gmail in first step

5. After adding your email, click on "Next Step" button to proceed
6. In next window, choose the option "Send through Gmail (easier to set up) option and proceed

7. In appeared window, click on "Send Verification". Gmail will send you a verification code on the email address which you have chosen to use with Gmail account. You will receive the code in your Gmail inbox as you have set the forward before. Open your Gmail inbox in a separate window, copy the code and paste it in appeared windows' concerned box to verify your email address.
 8. Now in last step, again go to "Settings" of your Gmail account. You will see an option saying "Send email as". In front of "Send email as" option, your added email addresses will be listed. Make the email address default which you have added recently. Now all emails will be sent from this email and you will receive the replies in same Gmail account.
 Congratulations! Now you have set up your own email address for Gmail. You might ask either you will be able to receive emails on your original Gmail ID or not. The answer is yes, you will receive emails on your original Gmail ID also.
No comments:
Post a Comment